
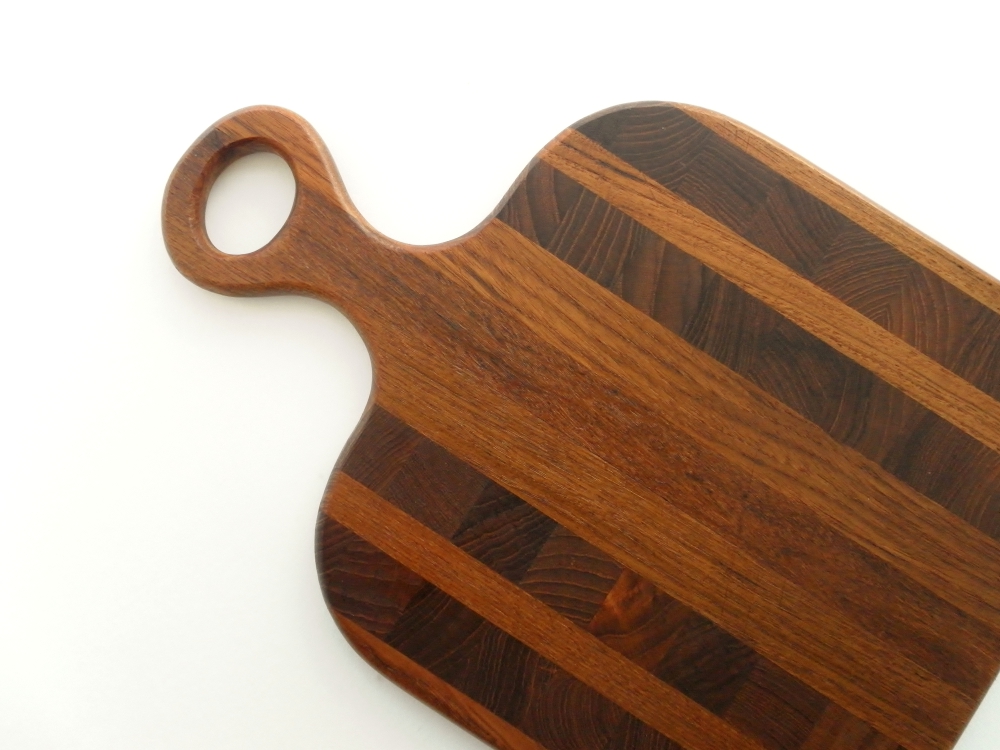
I love kitchenware that goes directly from the kitchen to
the table. One of the most versatile
materials which falls under the kitchen-to-table category is wood. Whether it’s for a snack of cheese and
crackers or a classic Caesar salad, the durability and beauty of wood makes it
the perfect platform for casual living. Refinishing
a seemingly worn out or broken wooden cutting board is a fun and rewarding
project to strengthen your refinishing skills with a big payback for your
efforts.
Frugal vintage projects such as refinishing a wooden salad
bowl or cutting board are cost effective and are recycling at its best! A cutting board is the perfect first project
and these are all the skills you’ll need for larger projects! Let’s begin with finish options:
Finishes
for Wood Cutting Boards and Wood Bowls
For a first-timer, selecting a finish for your project can
seem a little daunting. With a little
basic information making the right choice for your lifestyle and project is
easy. The purpose of the finish is not
only to protect the wood from unsightly damage but also makes it easier to clean
and keep sanitary. Cracks and checks
(lengthwise separation of the wood fibers), are not only unsightly, they
undermine the structural integrity of wooden kitchenware by providing a place for
bacteria to hide and reproduce. The
finish you choose and properly maintaining that finish will reduce the damaging
effects of washing with soap and water, lengthen the life and protect the
beauty of the wood.
Oil 101
Drying Oils – Linseed
Oil, Boiled Linseed Oil, and Tung Oil
- Drying Oils are absorbed into the wood and once dry harden the material. They are also considered sealers and reduce water absorption and make the wood resistant to scratches. They are more time consuming to use (requiring overnight to dry between each application) but provide the best protection. However, they are most expensive option and purchasing small amounts for a project of this size can be difficult.
- Non-drying oils simply penetrate the wood, keep it hydrated and provide protection against damage by soap and water cleaning. They require less time between coats and can easily be retreated, but do not deliver the complete protection that Drying Oils provide.
- Additionally, nondrying oils vegetable can become rancid over time (resulting in an unpleasant odor and taste to anything in which it comes into contact). In my opinion, nondrying vegetable oils aren’t the best option for items which won’t be used, cleaned and retreated on a regular basis. Having said that, I have and continue to use the highest quality extra virgin Olive Oil to season salad bowls without incident. It is important to note Walnut oil is recommended by many manufacturers and wood artisans and should be used when suggested by the manufacturer or artist.
- While I’ve never used paraffin wax to finish anything, according to the Department of Agriculture article “The Finish Line”, it is one of the simplest ways to finish wood countertops, butcher blocks and cutting boards. Application instructions from the article state to apply by brushing melted paraffin wax (the type used in home canning, utilizing a double-boiler to melt) onto the wood surface and allow it to be absorbed into the wood. The excess wax is then scraped off prior to use.
- Bee’s wax is also a fairly expensive option but works well, gives a beautiful patina and can be used after using Tung Oil finish. Two coats are recommended. Apply a small amount of Bee’s Wax wood finish by hand or with a soft cloth. Allow to dry, then buff with a clean soft cloth to a beautiful Bee’s Wax luster. Apply additional coats of Bee’s Wax as needed.

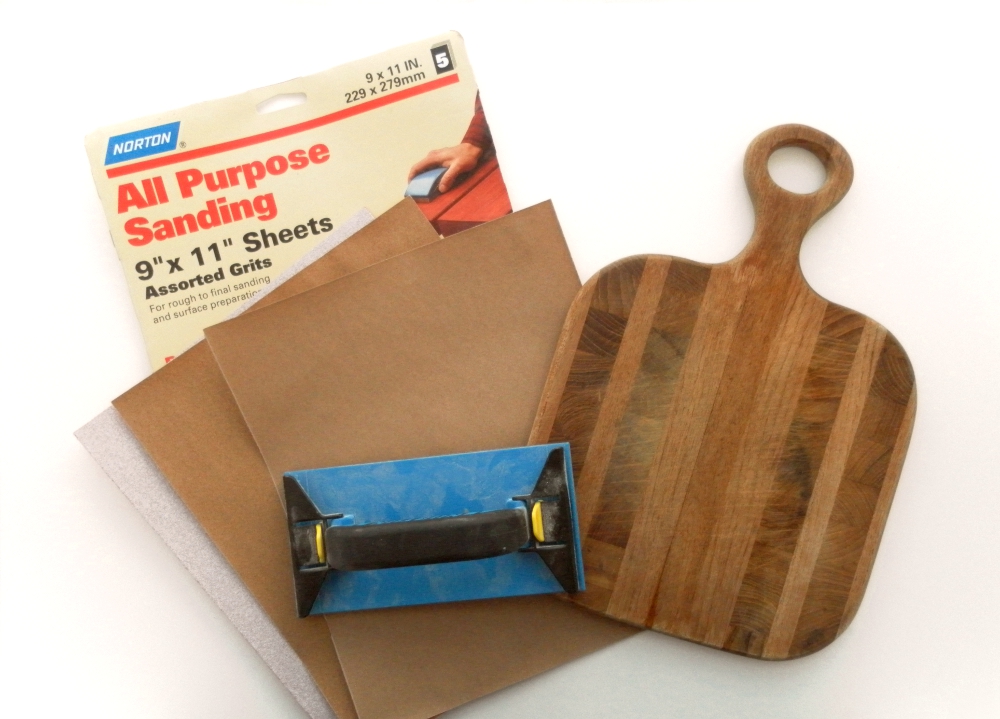
Things You’ll Need
- Sandpaper in 100, 150 and 220 grits (You can easily find combination packages of sanding paper at any home and garden or hardware store.) Sanding grits close to these will work just fine for a project like this.
- Sanding block
- Clean soft cloth
- Wood putty (If repairs are necessary.) There are two part epoxy putties which come in wood colors which will saved the step of staining. Just follow the manufacturer's instructions.
- Putty knife (If repairs are necessary.)
- Finishing supplies – Food Grade Mineral Oil
Prep Work
Thoroughly clean the cutting board with soapy water and
allow it to completely dry; preferably overnight. If any gluing is required this should be done
prior to cleaning.
 |
| Make sure to sand with the grain of the wood. |
Step 1 - Sanding
For this project I will be hand sanding using a small sanding
block. It almost eliminates the
possibility of chatter marks and frankly is more enjoyable to me. The first step in sanding is the use the 100 grit sandpaper to remove any deep cuts in the board. Place your board flat on a solid level
surface and make sure you are using even pressure and long strokes sanding with
the grain of the wood. Do not be over
zealous with this step as this grit sandpaper will quickly consume the wood.
When most of the scratches, deep cuts and any stains have
been sanded off; inspect your cutting board both visually and by running your
hand over the surface to make sure the surface is level. Repeat the process with the 150 grit sandpaper
and, this time, sand the sides of the board by hand if necessary (again working
with the grain in smooth strokes). Once
you have completed these steps rinse the board with water and allow it to completely
dry. This is the time you’ll repair any
nicks if necessary. If your piece
doesn’t have any nicks proceed to Step 3.
 |
| First sanding with 100 grit sandpaper complete. |
Step 2 - Repairing
This is the point where you’ll fill any chips, nicks or
cracks with wood putty. Use the putty knife to remove any excess
putty and smooth the edges. Allow the
putty to harden according to the manufacturer’s instructions.
 |
| Sanding complete. You will see I couldn't get all the deep cut marks out. |
Step 3 – Final Sanding
Sand the entire cutting board with the 220 or 240 grit sandpaper
to for the smoothest finish. Thoroughly
rinse with running water and dry completely. Please don’t skip this important step as wood
dust residue in the finish will dull your knives!
Step 4 – Apply the
Finish
I suggest at least three coats of food grade Mineral Oil but four or five would be better. Liberally
apply the Mineral Oil with a soft clean cloth stroking with the grain and allow
it soak in for at least 20 minutes or until the board begins to look dry and
thirsty. Reapply coats until the board
looks as if it won’t absorb any more oil.
At this point you can remove any excess oil or allow it to stand
overnight (preferred) and then remove any excess.
 |
| Make sure to rub the finish with the grain of the wood. |
Step 5 - Monthly Care
 |
| Isn't she a beauty? |
Now enjoy! A small bunch of grapes, cheese and crackers will taste
so much better when served on your lovely “new” board!
11 comments:
Oh my gosh! I think I can really do this! Wonderful description, carefully describe steps, and looks like you have included everything I need to know. Thank you so much. This is great.
Fascinating information here! I think you covered it all! Instead of trashing it, refinish it! PLEASE!
WOW! What a beautiful end result! Great post!
You just convinced me to try this out! Doesn't look too hard and your tutorial makes it seem like even I can do it! Wonderful post!
That's seriously awesome! It looks like a new board! I'l add this to my (never ending) list of DIYs to try!
www.scavengenius.com
Wow this is amazing!!!! i have seen a few vintage cutting boards in my travels and always passed them by because they seemed beyond hope. but now, no more! thank you!
I have to second the above - I can't even tell you how many cute vintage cutting boards, cheese boards, etc I have passed up in my travels because they were so dull and scratched - next time I won't have to pass! Thank you so much for sharing!
Thank you for very informative information! I've been using Mineral Oil because I thought that's what my Mother used 45 years ago on our butcher block counter tops. Things change so much with the times and new products that I wasn't 100% sure that Mineral Oil was still the way to go. Nice to know that some things haven't changed!
perfect information! It isn't hard to redo a cutting board. I have been using mineral oil for years on all my boards, then I apply a mineral oil and beeswax mixture to help protect it from drying out.
check out a few pictures I have posted.
Michael
Board Butter for cutting boards
Vintage And Main: Diy: Refinishing A Wood Cutting Board >>>>> Download Now
>>>>> Download Full
Vintage And Main: Diy: Refinishing A Wood Cutting Board >>>>> Download LINK
>>>>> Download Now
Vintage And Main: Diy: Refinishing A Wood Cutting Board >>>>> Download Full
>>>>> Download LINK U0
Experience the finest craftsmanship with Quality Prime Leather Jackets USA! Our jackets are crafted from premium leather, offering the perfect combination of durability, comfort, and timeless style. Whether you’re looking for a bold statement or a classic design, Quality Prime Leather Jackets USA ensures you stand out with confidence. Elevate your wardrobe with luxury that lasts!
Post a Comment