Wednesday, February 27, 2013

History Lesson: Teddy Bears

Vintage mohair teddy bear, Mulberry Terrace

Teddy bears are named after Theodore Roosevelt, the American president who refused to shoot a bear cub on a hunting trip in 1902.


The following year, inspired by a political cartoon in The Washington Post that depicted President Roosevelt's refusal the shoot the bear, Morris Michtom, a Russian immigrant living in Brooklyn, created a stuffed bear for children. That same year, the German toy company Steiff also created a stuffed toy bear, so historical credit goes equally to Michtom and Steiff, two toy-makers on opposite sides of the world. Talk about a happy coincidence!

Antique and vintage teddy bears are highly collectible today. They can be identified and dated by label, materials, color and form. Before World War II, bears usually had long limbs with large, upturned paw pads, pronounced snouts and humped backs. They were almost always made from mohair with a solid feel (they were stuffed with wood shavings or the thick fibers from kapok trees).

After the war, bears changed in form with shorter limbs and softer, plumper bodies, less pronounced snouts, and rounder heads. Teddy bears have stood the test of time with stuffed animals now made in every species, shape, size and color. There are even stores where families can go to stuff and dress their own custom teddy bears. Thanks, Teddy Roosevelt!


Cartoon photo source: The Washington Post

Friday, February 22, 2013

History Lesson: Kuba Komet


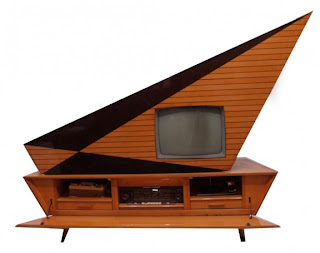
With its sleek, angular design and quirky name, you may mistake the Kuba Komet for one of IKEA's  television consoles. On the contrary, these German-manufactured TV cabinets are highly unique, having ended production in 1962 after just 6 years on the market.


Featuring a built-in black & white TV, an 8-piece speaker system, a 4-speed Telefunken phonograph, and a Telefunken multi-band AM/FM radio, the Kuba Komet was cutting edge for the 1950s. The suggested retail price was nearly $1300, more than what the average German worker earned in one year!

Its futuristic design was inspired by a sailboat, with its top cabinet able to swing back and forth like a ship's sail. Pretty swell, Daddy-o!

Kuba Komet
Kuba Komet closed...

Kuba Komet
... Kuba Komet open!


Image credits: liveauctioneers.com; earlytelevision.org

Wednesday, February 20, 2013

New Uses For... Vintage Soda Crates

Bookcase, Regines Kreativiteter


Looking for rustic furniture but feeling discouraged by the prices at high-end antique stores? Vintage soda crates may be the answer to your decorating dilemma. Once used to deliver soda bottles to residences and restaurants, wooden soda crates can now be used to add worn, weathered charm to modern-day homes. 

Soda crates are simple & stylish solutions for: 

coffee tables
side tables
wall units
bookcases
shadow boxes
magazine holders 

They can be found at flea markets, antique markets, Kijiji, Craigslist and Etsy for reasonable prices.


Magazine holder, Mechant Design

Shadow boxes, A Sort of Fairy Tale
Wall storage, Apartment Therapy
Side table, Dreamy Whites

Coca-Cola shadow box, Callooh Callay

Rolling magazine rack, Milk Crate Digest

Vintage Pepsi crate, MFEO

Monday, February 18, 2013

History Lesson: Video Killed The Radio Star

Bulova Radios, 1958

Most of us listen to the radio at some point during the day, so it's difficult to imagine when the first radio was introduced over 100 years ago, owning one was considered a novel luxury. Well, the novelty soon wore off, and by 1933 two-thirds of American homes had at least one radio, twice as many as those with a telephone. By the late 1950's,the transistor was all the rage and design became a huge selling point for consumers. What started out as a utilitarian box, the radio evolved over time to mimic many of the design cues found in the automobile industry, as well as the growing fascination with space travel. Some of the most sought after vintage radios were produced in Japan and the USA during this golden age of radio design. With a little luck, and a few extra bucks, you might be able to snag some of this yummy retro eye-candy for yourself!

Turquoise Motorola Clock Radio
 Good Bones Vintage Co.

Vintage RCA Transistor
 The Open Sesame


 Restored,iPod Ready Philco Radio
 Retro Roxy Rhonda


Zenith 500B Transistor, Flickr


Kobe Kyogo Transistor, Flickr

Friday, February 15, 2013

Six Super Easy & Quick Craft Projects

Looking for a fun weekend project, but can't ever seem to find the time? Try one of these projects and you'll be done before you know it! You can expect to complete each of these super easy, and affordable projects in around 45 minutes or less - so what are you waiting for, warm up your glue gun and get crafting!

1. Embroidery Hoop Wall Pocket

Abernathy Crafts


This no-sew project requires just a few supplies - an embroidery hoop (any size) and two coordinating scraps of fabric! To get started, be sure your fabric is just slightly larger than your hoop. Next, decide how big you want your pocket, and line up the coordinating fabric accordingly on top of the main fabric. Place both pieces of fabric on the bottom hoop. Slip on the outer hoop and tighten just enough to hold the fabric in place. Gently tug the fabric around the bottom edges to make it taut inside of the hoop. When you are satisfied with the placement, cut the excess fabric or tuck it behind the hoop. Be sure to tighten your hoop all the way so that the fabric doesn't slip out.


2. Glitter Cat Eye Sunnies


The Glitter Guide

Grab some thrift store plastic cat eye shades and give 'em a little bit of Hollywood bling! To complete this project you'll need three bottles of nail polish - silver, glitter and a clear top coat. Paint a silver base around the corners - use a silver Sharpie to draw your guidelines if needed. Next, add the sparkle polish and dry thoroughly. Finish with the clear top coat. The finished product not only looks like you spent a fortune, it will help shield you from all the paparazzi!


3. Thread Spool Wine Corks


A Beautiful Mess


Grab some corks, wood spools and a few other supplies you probably already have around the house, and you're on your way to giving boring wine bottles a little extra personality. Start by wrapping a spool with double sided tape. Next wrap the taped spool completely with thread (embroidery thread works great!) making sure all the wood is covered. Lastly, use a small dot of glue to secure the end of the thread. Use wood glue to adhere the corks to the end of the spools. Allow spools and corks to dry completely. This project also works great with new or vintage spools that already have thread on them!

4. Fabric-Covered Suitcase


A Beautiful Mess


Jazz up an old vintage suitcase with your favorite fabric for a fun, fresh new look! Before you get started, please keep in mind hard cover cases with stitched seams work best for this project. Once you have your suitcase selected, choose a piece of coordinating fabric and lay it print side down on the case. Trace into the groove of the seam then cut an extra 1/4" around your trace line. Be sure to iron the fabric before adhering it to the case. Next, spread a thin layer of Mod Podge over 1/3 of the case making sure to spread it all the way to the edge. Line your fabric trace line up to the edge of the suitcase. Carefully smooth out the fabric as you go. Continue applying Mod Podge over the remaining 2/3 of the case, pressing fabric down until the case is completely covered. Now that the case is covered, you'll notice that your fabric is hanging about 1/4" over the edge. Pull the excess tight over the edge and trim with scissors then tuck into the seam, or use a rotary cutter to simultaneously tuck and trim. To give the corners a professional look, lift the fabric up slightly and create little pleats, add a bit more Mod Podge and press down. Voila, new life for an old suitcase! 


5. Orange Peel Candle


Eliza K Prints

Who needs expensive store-bought candles, when you can create your own with items you already have in your kitchen! To get started, cut an orange in half and gently carve out the "guts" with a small, sharp knife being careful not to rip through the outer peel. IMPORTANT: as you carve, be sure to leave the stem in the middle as this will serve as your wick. Once the orange is carved out, pour canola oil to fill the orange just below the top of your wick. Place the orange on a plate or stand, since natural candles have a tendency to burn through. Now, light your wick and sit back and enjoy the subtle orange aroma! Burn time is roughly 30-45 minutes.


6. Costume Jewelry Embellished Mirror


We saved the easiest project for last! In fact, you'll probably spend more time hunting for vintage brooches, earrings and necklaces than actually putting this mirror (or frame) together! Once you've assembled all your bling, carefully remove any fasteners, pins, clips, etc with wire cutters. Don't worry if you can't get the back of your piece totally flat, it will just add a little dimension. Arrange the jewelry on your mirror and secure with a hot glue gun. Using tweezers will help place the jewelry in just the right spot, it also helps keep you from getting burned by the hot glue!

Wednesday, February 13, 2013

Retro Tunes: Valentine Playlist

The 1950's Unlimited
Every now and then, my inner DJ surfaces to create a special playlist - guess I'm still trying to create some of that mix tape magic from high school! Today, via the wonders of digital technology, I've assembled a few of my favorite retro songs about love that will hopefully get you in the mood for your special Valentine!

Valentine Playlist by Bryan Peterson on Grooveshark

Monday, February 11, 2013

Get The Look: That 70's Office


Tired of looking at the same old boring desk accessories day after day? Switch out the big box boring for something with a little retro swagger! 

The 70's office had a look all it's own with manual typewriters, flip clocks and desk-size calculators. Harvest gold, avocado green and shades of orange could be found on just about everything that wasn't already adorned with a plastic wood grain finish.

Treat yourself to a mini office makeover and explore the goovy side of work with a few choice 70's accessories!


Friday, February 8, 2013

Retro Recipe: Almost No-Bake Pink Lemonade Pie


This super easy, super pretty pink lemonade pie tastes as good as it looks! 
Best of all, it's guaranteed to get you some extra hugs and kisses from your special valentine.  

Step One: The Crust

Ingredients:
1 1/2 cups graham cracker crumbs
1/4 cup sugar
4 tablespoons butter, melted


Directions:
  1. Preheat oven to 350°.
  2. In a small bowl, mix the crumbs, sugar, and butter with a fork until the mixture is uniform.
  3. Press the crumbs across the bottom and up the sides of a spring-form pan.
  4. Bake for 8 -10 minutes, or until just golden brown.
  5. Allow crust to cool completely.

Step Two: The Filling
Ingredients:
(1) 8 oz. package regular cream cheese
(1) 14 oz. can sweetened condensed milk
3/4 cup frozen raspberry (pink) lemonade concentrate (do not add water)
2 tablespoons lemon juice (fresh or bottled)
2-3 drops of red food coloring

Directions:
  1. Using the whip attachment on your stand mixer, or with a handheld electric mixer, mix the cream cheese until softened.
  2. Add the sweetened condensed milk slowly to avoid clumping, scraping the bowl as you go.
  3. Slowly add the lemonade concentrate and lemon juice, mix well.
  4. Add 2-3 drops of red food coloring to achieve desired shade of pink.
  5. Pour the mixture onto crust in the spring-form pan and place in the freezer for 10-15 minutes, or until stiff.

Step Three: The Topping
Ingredients:
1/3 cup shredded coconut
1-2 drops of red food coloring
(1) 12 oz. or 16 oz. container of Cool Whip

Directions:

1. Place coconut in a small plastic zip top bag. Add 1-2 drops of red food coloring, seal the bag and shake until  coconut turns pink.
2. Remove your pie from the freezer, add Cool Whip layer to desired thickness, top with pink coconut. Return pie to the freezer.

Cover with tin foil and freeze for 2-3 hours, or until completely firm. Cut with a warm wet knife to produce picture perfect slices!


Recipe and photos adapted from The Prepared Pantry

Wednesday, February 6, 2013

Every Day Solutions: Kitchen Containers


Ahh, the junk drawer. We all have one. It's the place where stray paper clips get tossed and countless pens dry out over the years. That spare key you lost six months ago is probably in there, along with the needle and thread you needed last week to repair your favorite shirt. It's a doohickey graveyard of sorts, the place where your important miniatures get hidden because they don't have a true home.

But you don't have to banish your belongings to a life of darkness. Basic kitchen wares can double as organizers (and triple as cool, eclectic decor) so your doodads can once again see the light of day and get out of that junk drawer!


Featured merchants:
1) http://www.etsy.com/shop/forgottenPLUM
2) http://www.etsy.com/shop/VintageRescueSquad
3) http://www.etsy.com/shop/VintagetothePeople
4) http://www.etsy.com/shop/suesuegonzalas
5) http://www.etsy.com/shop/AmyKristineVintage
6) http://www.etsy.com/shop/raeraesisters
7) http://www.etsy.com/shop/seelamade
8) http://www.etsy.com/shop/BootsNGu

Monday, February 4, 2013

Friday, February 1, 2013

History Lesson: Revenge of the Ranch


Antiquehome.org
Raise your hand if you grew up in a ranch house.  Like many of my generation, I spent my formative years in a one-story, low-slung ranch in suburbia. 

For better or for worse, the ranch has been called ugly, unwanted, an architectural stepchild and a tear-down target; but lately it has become the darling of the real estate and preservation world. A new generation of young families have come to appreciate the lowly ranch for its simple, open concept of living.


Midcenturia.com
While the ranch home can seem bland, historians point out the original concept was downright radical for its time. According to Slate’s architecture critic, Witold Rybczynisk, the ranch house represented a revolutionary departure from America’s love affair with nostalgic “domestic status symbols” like formal entryways, dormers, pitched roofs and porticos.  

The ranch house format can be traced back to 19th century Spanish Colonial adobes; but the concept really took off in post World War II California. By 1950, the ranch was so popular it accounted for nine out of every 10 new homes being built.


Developers cashed in on the demand by embarking on a suburban building boom of unprecedented size and scope – the suburban subdivision was born!


So what makes a ranch, a ranch? While there are many variations of the classic ranch style, the typical ranch usually features many of the following characteristics:


  • Single story
  • Low pitched roof
  • Deep-set eaves
  • Horizontal, rambling layout
  • Rectangular, L or U shaped
  • Attached garage or car port
  • Simple, open floor plans
  • Lack of ornate decorative details
  • Open concept kitchen/living spaces
  • Large "walls of windows"
  • Integration with outdoor spaces
SportSuburban on Flickr

                                                                             
A simple idea, affordable unpretentious  homes built for young families. So, why did the ranch fall out of favor? Easy, with the proliferation of ranch homes, buyers simply started seeking out other styles.

In addition, the ranch was perceived as being too small, especially compared to the super-sized "McMansions" that became the norm in the mid-1980's. But as with all things, tastes change and "everything old is new again." Such is the case for the ranch house. As a new generation seeks out these mid century gems, and preservation societies around the country begin designating the ranch home as historically significant, the ranch is enjoying a well deserved renaissance - long live the ranch!